Great as a snack or dessert, these kid-friendly fruit scones are easy to prepare with just a few simple ingredients. Serve them plain or with some jam for a delicious treat!

Fruit scones are loved by both kids and adults. They’re lightly sweet with a biscuit-like texture, and we enjoy them plain or halved with jam or clotted cream on top—if we can hold on to any!
If you think they're too difficult to make or require kneading or special baking equipment, think again. Just follow my steps below, and I’ll show you how to whip up this delicious kid-friendly fruit scones in no time!
Jump to:
👩🏻🍳 Why you should try my recipe
- Suitable for toddlers and kids of all ages.
- Ready in under 30 minutes.
- Perfect for snacking and easy to pack.
- Great plain or with jam or cream.
- Freezable for batch prepping.
🥘 Ingredients
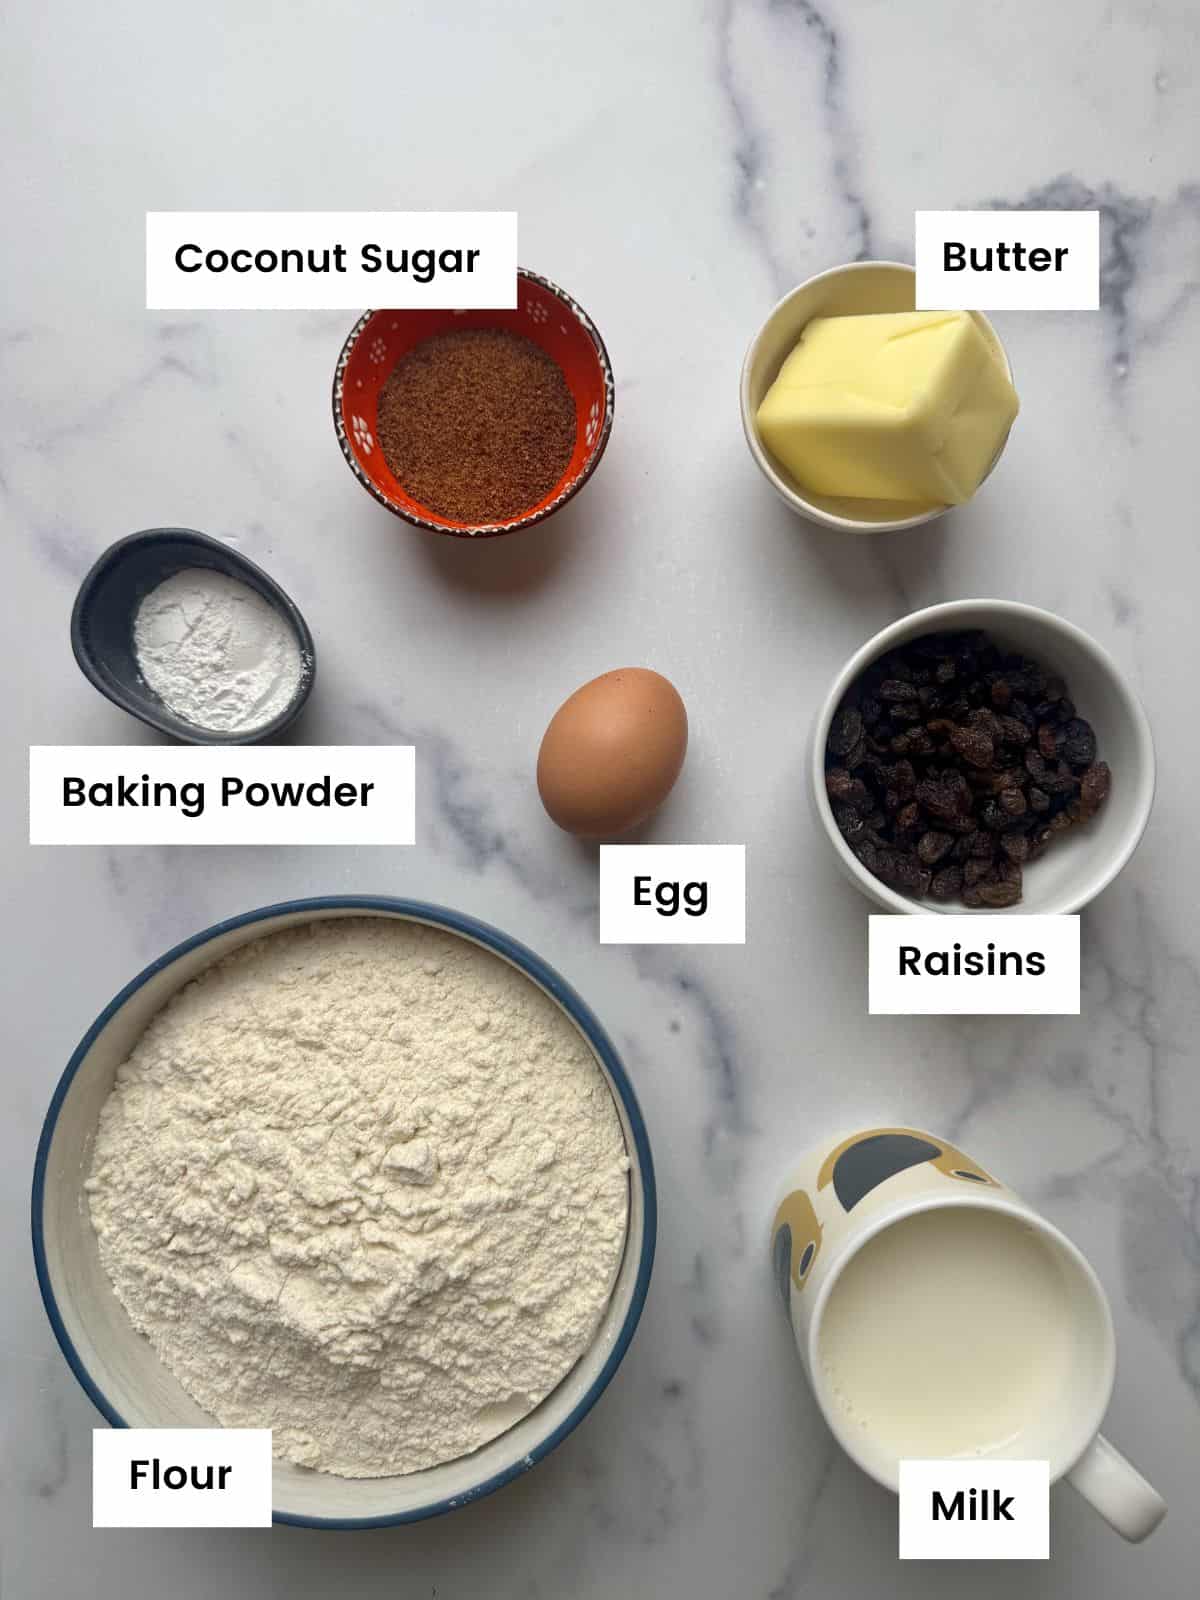
To make these easy kid-friendly fruit scones, we are going to use all-purpose flour, baking powder, milk, butter, coconut sugar, raisins and an egg.
- Milk: I'm using whole milk, but you could use low-fat or a dairy-free alternative of your choice.
- Raisins: You could use just raisins or mixed dried fruits.
- Butter: It needs to be cold and straight out of the fridge, as we'll be using the rubbing method with the flour to incorporate it in.
- Coconut Sugar: I'm using two tablespoons of coconut sugar to add some sweetness to the dough. You could leave it out or reduce it to one tablespoon.
For full quantities and to print the recipe, see the recipe card below.
🔪 Step-by-step Instructions
So get your ingredients ready and let's get started!
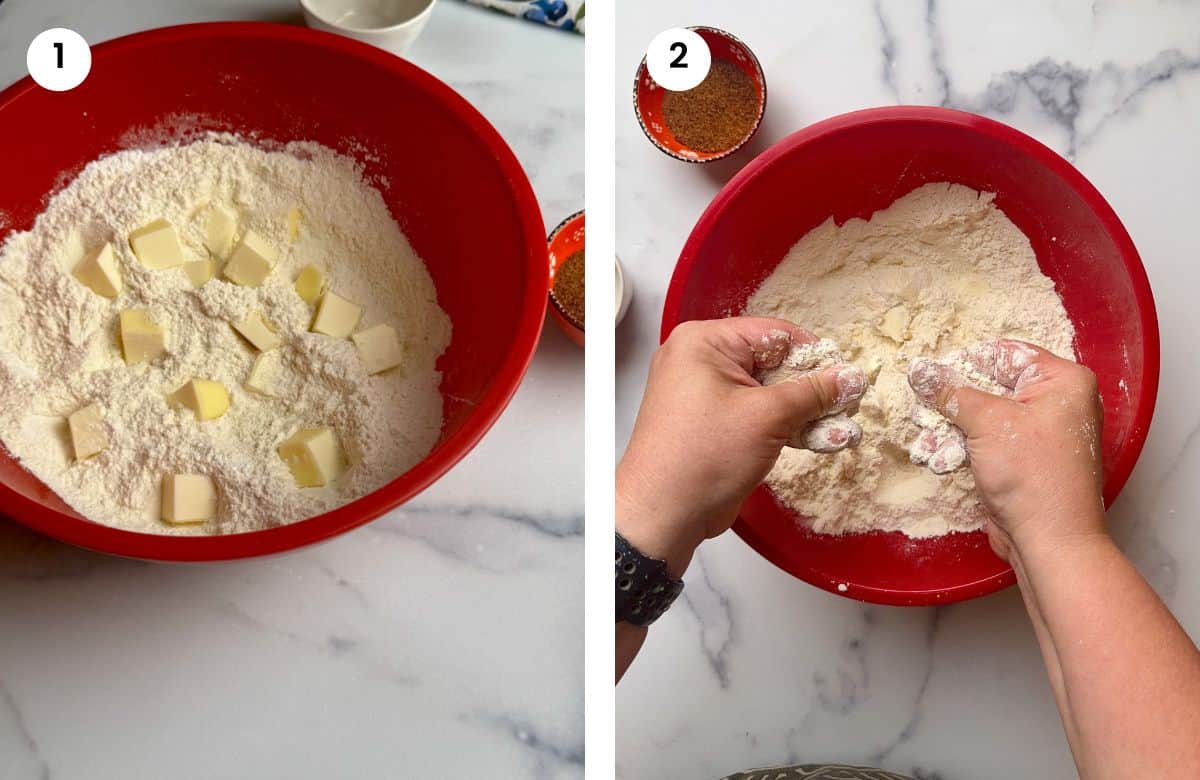
01. In a bowl, I add flour and baking powder and mix to combine. I cut the cold butter into cubes and add it to the bowl.
02. Using my fingertips, I start rubbing the butter with the flour until I have a sandy texture.
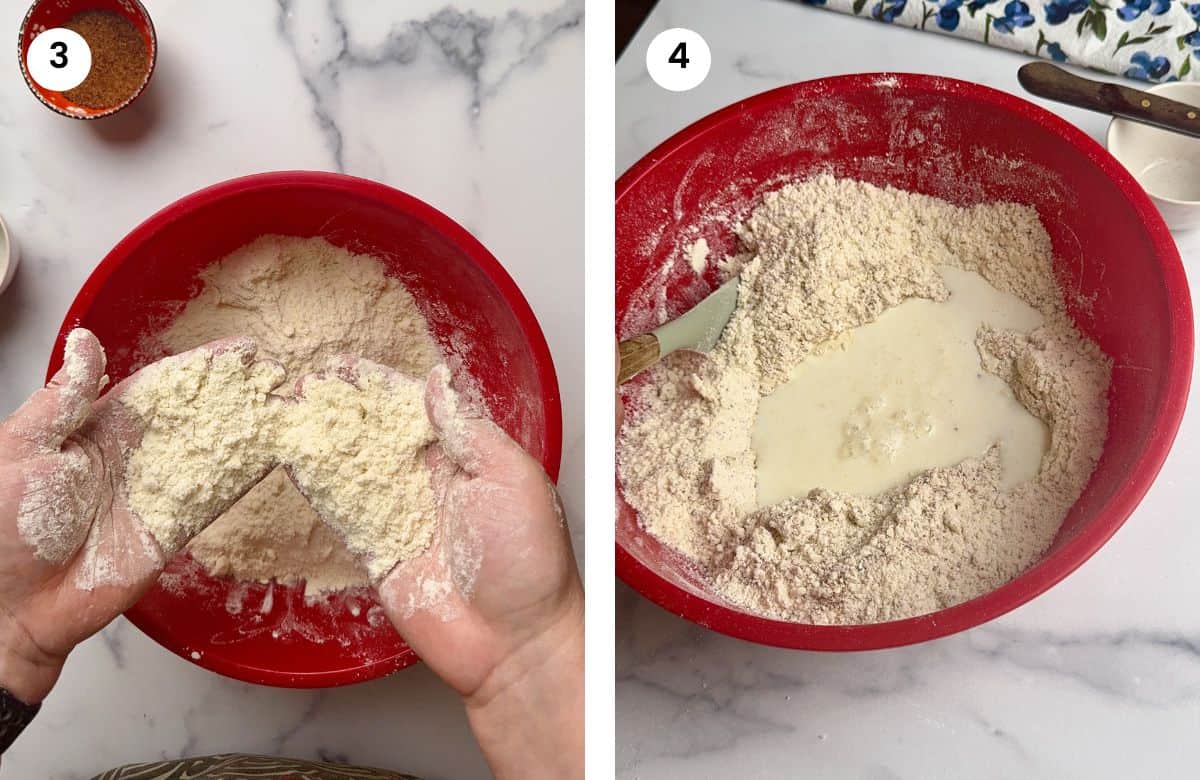
03. Next, I add the coconut sugar to the mixture and combine it with the flour and butter. If you'd like, you could add a teaspoon of vanilla extract for extra flavor.
04. Then I make a well in the middle and add the milk. With a spatula or my hands, I start mixing the flour with milk until all combined.
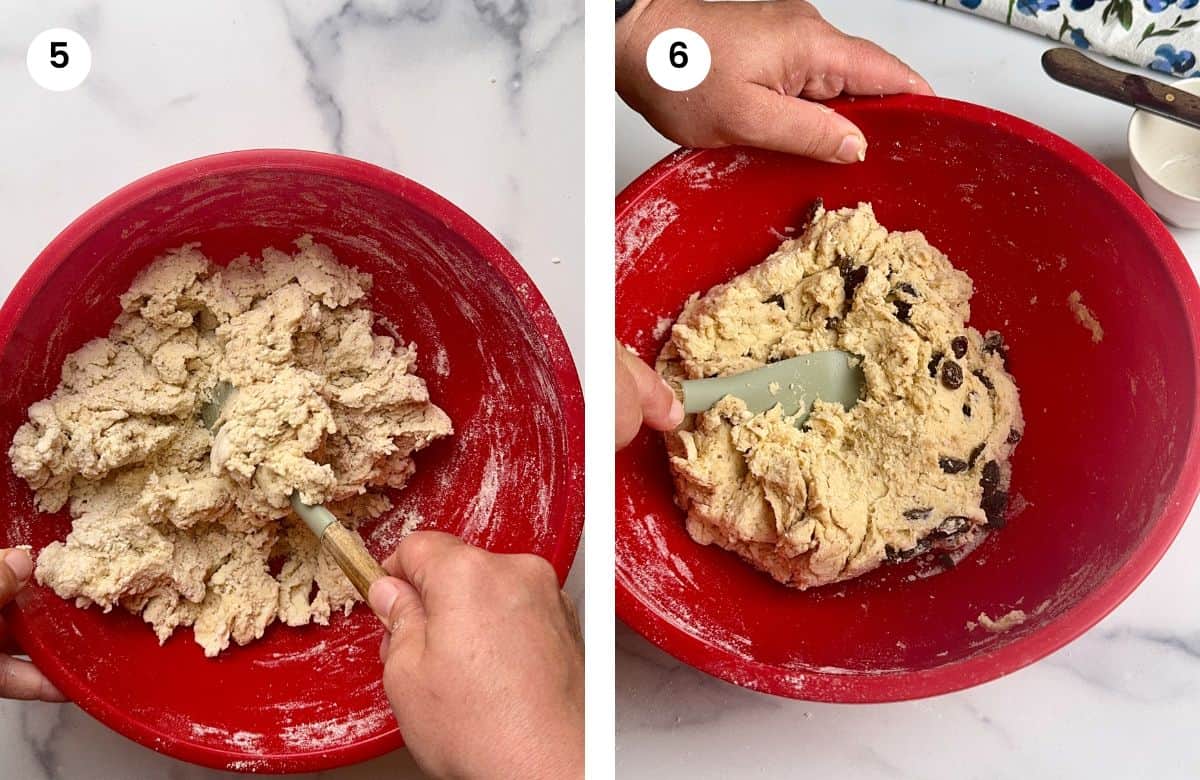
05. If it gets too difficult to mix with a spatula, I use my hands to incorporate the remaining flour. Try not to overwork the dough—we don’t want the butter to melt or the dough to become too tough.
06. Finally, I add the raisins or mixed dried fruit to the dough and just press with a spatula to combine and spread them.
07. I dust my wooden board with some flour and place the dough on top. I stretch it vertically about 3 palms long and then fold it. Then I repeat the stretch and folding one more time. This helps to add more layers when baked.
08. Next I form the dough into a ball using both hands and forming a big cup. Using a rolling pin, I open the dough into a round shape, about 1" / 2.5cm thickness.

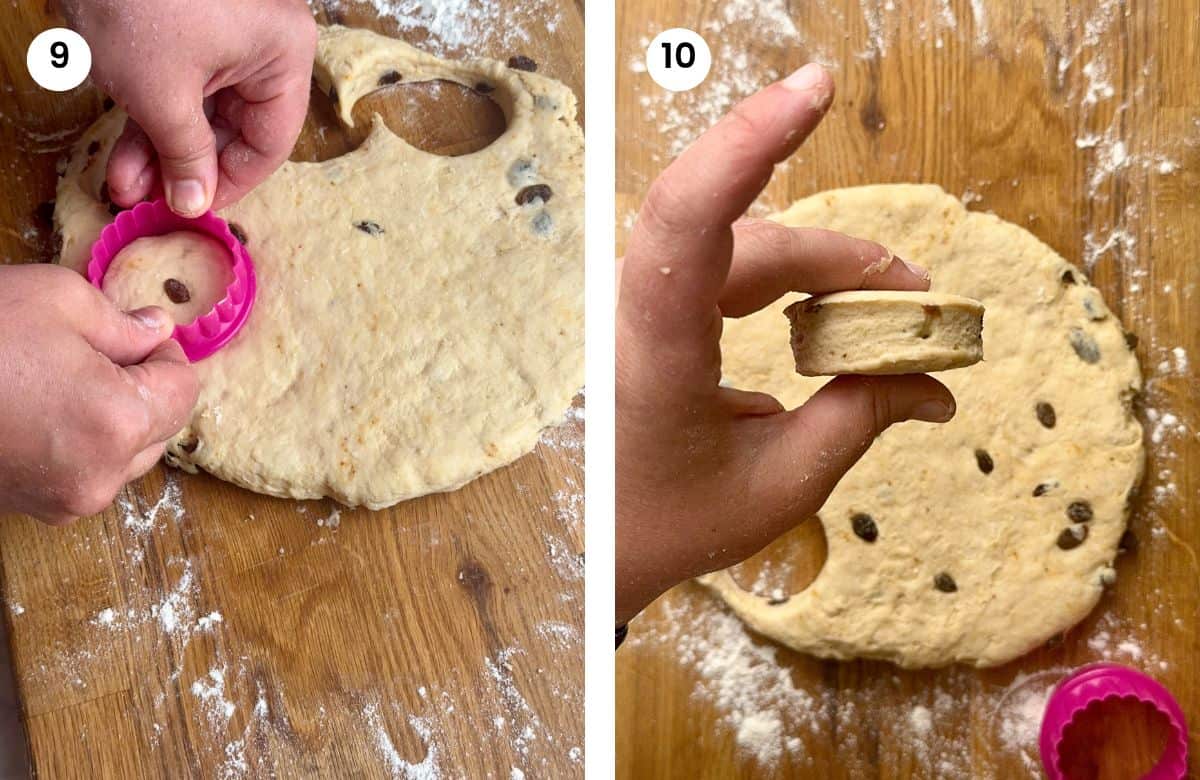
09. Using a round cookie cutter—2 inches or 3 inches if you prefer them larger—I cut out the fruit scones by pressing straight down into the rolled dough.
10. Try not to twist the cutter—just press straight down firmly and lift it up to release the scone. This helps the scones rise evenly rather than forming a domed top in the oven.
11. I place the scones on a lined baking tray. In a bowl, I break the egg and add a tablespoon of water, then beat until combined. I brush each scone with the egg wash to achieve a beautiful golden-brown top. If your little one has an egg allergy, simply skip this step—the scones won’t have the shiny finish, but they’ll still taste delicious!
12. Make sure to leave some space between the scones to allow for airflow and help them rise nicely. They take about 12–14 minutes to bake—we don’t want the dough to be raw in the middle, but we also don’t want to overbake them, as they can become too dry.

🍽 Serving suggestions
Babies 6m-12m: For babies who have just started their solids journey, you could leave out the coconut sugar and just have the raisins for sweetness. You could cut the scones in half and offer them as a little treat.
Toddlers & Older kids: For all other ages, you could offer them plain or cut them in half and spread some jam or a nut butter or clotted cream or cream cheese for some extra flavor.
🧰 Storage
If you have any leftovers of these kid-friendly fruit scones, I recommend storing them in an airtight container at room temperature for up to 3–4 days. After that, they tend to harden.
These scones also freeze well—just place them in a freezer-safe bag or container and store for up to 3 months. To enjoy, thaw at room temperature for a couple of hours or warm them in the microwave until heated through.

💭 More treat ideas
Here are some more kid-friendly treat ideas that the whole family can enjoy
❓ FAQ
Fruit scones are easy to hold and soft to bite, making them suitable for little ones that are still learning to eat solids. Leave out the sugar and just stick to the raisins for natural sweetness.
📋 Recipe

Easy Fruit Scones (kid-friendly)
Ingredients
- 2 ½ cups all-purpose flour (400gr)
- 4 teaspoons baking powder
- 2 tablespoons coconut sugar
- 1 cup milk
- ⅓ stick butter (75gr)
- ½ cup raisins (100gr)
- 1 egg (for brushing)
Instructions
- In a bowl, add the flour, baking powder. Mix to combine.
- Cut the cold butter into cubes and add it to the bowl. Use your fingertips to rub the butter with the flour, until it resembles breadcrumbs. Alternatively, you could use a food processor.
- Add the coconut sugar and mix to combine.
- Add the milk and gently mix with a spatula or your hands until it becomes dough.
- Add the raisins and mix to combine.
- Sprinkle some flour on the counter or a wooden board. Place the dough on top and stretch the dough with hands vertically. Then roll and fold 2–3 times. Repeat one more time.
- Form the dough into a ball using both your hands, forming a big cup. Then using a rolling pin, open the dough into a round shape about 1" / 2.5cm thickness.
- Using a 2" cutter (or 3" for bigger ones) cut the dough into circles by pressing all the way down but NOT twisting. Lift the cutter and gently press down to release the scone if it's stuck.
- Place the scones on a lined baking tray. Form the remaining dough into a ball without kneading it too much and lay flat again with the rolling pin. Use the cutter to shape the rest of the scones.
- In a bowl, beat the egg with a tablespoon of water. Brush the scones with the eggwash.
- Bake in a preheated oven to 400℉ / 200℃ for 12–14 minutes.
Video
Notes
- Leave out the coconut sugar if you are making the fruit scones for babies under 12 months.
- You could use raisins or mixed dried fruits.
- For children with an egg allergy, skip the eggwash or you could brush the top with milk.
Nutrition
🥣 More to try
If you liked my kid-friendly fruit scones, you should try some of these recipes too:


Julia Droulia
My kids love these fruit scones! They are flaky, just enough sweet and perfect for snacking. If you tried them and you like them too, leave me a rating and a comment here.